
Texas-Style Brisket
Low and slow. No shortcuts. This is a weekend commitment and it’s worth every hour. First thing I did stateside after my last deployment — bought a smoker. Not a grill. A smoker. Because I’d spent six


Off the Galley Mike
Mike — Off The Galley
Six years as a Navy cook on submarines and destroyers, feeding 130 sailors from a galley the size of your bathroom. Now I cook the same big-flavor, no-nonsense food for my family of four — and share every recipe here. No culinary school. No fancy plating. Just real food that works, tested on the toughest critics afloat and the pickiest ones at home.
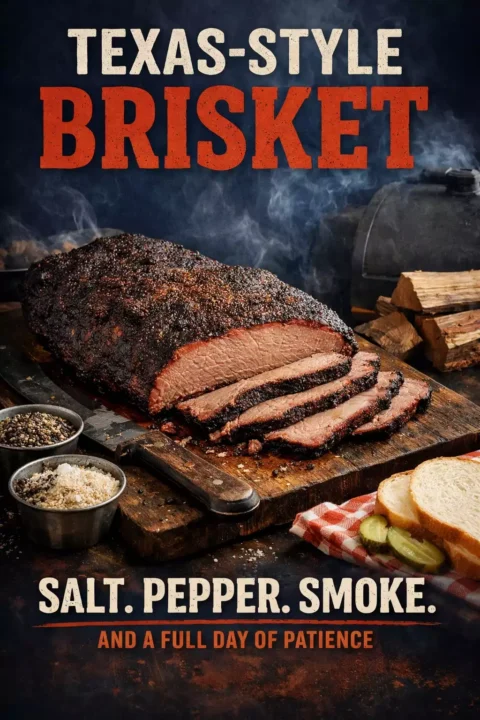
Texas-Style Brisket — Salt, Pepper, Smoke, and a Full Day of Patience
Low and slow. No shortcuts. This is a weekend commitment and it’s worth every hour. First thing I did stateside after my last deployment — bought a smoker. Not a grill. A smoker. Because I’d spent six months dreaming about brisket, and I decided I was going to learn to make it myself rather than depend on a restaurant to satisfy that craving.
Texas-style brisket is the purest expression of barbecue: salt, pepper, smoke, and time. No fancy rubs, no complicated marinades, no injections. The beef does the talking. Your job is to maintain 225°F for 12-14 hours and resist the urge to open the lid every 20 minutes. That’s harder than it sounds.
The Rub — Keep It Simple
True Texas brisket uses a “Dalmatian rub” — equal parts coarse black pepper and kosher salt. That’s it. Some pitmasters add garlic powder, and I’m one of them. It adds a subtle savory layer without competing with the beef and smoke flavors. Mix 2 tablespoons each of coarse kosher salt, coarse black pepper, and garlic powder. Apply liberally to all surfaces of the trimmed brisket.
For the best results, season the brisket the night before and refrigerate uncovered. This dry brine allows the salt to penetrate the meat, seasoning it deeply and helping retain moisture during the long cook.
Ingredients
1 whole packer brisket (12-15 pounds), 2 tablespoons coarse kosher salt, 2 tablespoons coarse black pepper, 2 tablespoons garlic powder (optional), hardwood for smoking (oak, hickory, or pecan).
The Trim
Trim the fat cap down to about 1/4 inch thickness. Remove any hard pieces of fat that won’t render during cooking. Trim the thin, dried-out edges of the flat. A sharp boning knife makes this manageable. Spend 20-30 minutes on this step — proper trimming ensures even cooking, better bark formation, and a more presentable final product. Cold brisket is easier to trim, so work straight from the fridge.
How to Smoke It
Phase 1: The naked smoke
Set your smoker to 225°F with your chosen hardwood. Place the brisket fat-side up with the point end (thicker section) facing the heat source. Close the lid and walk away. Seriously — don’t open it for at least 3 hours. After that, check hourly until the internal temperature reaches 165°F. This takes roughly 6-8 hours. During this phase, the bark forms — that dark, flavorful crust that’s the signature of great brisket.
Phase 2: The wrap (Texas Crutch)
When the internal temperature hits 165°F, the brisket will “stall” — the temperature plateaus as moisture evaporates from the surface. This is normal and can last hours. To push through the stall, wrap the brisket in butcher paper (preferred for bark preservation) or aluminum foil (easier, juicier, softer bark). Return to the smoker.
Phase 3: Finish and rest
Continue smoking at 225°F until the internal temperature reaches 202-205°F and a probe slides in with zero resistance — like poking a stick of warm butter. This is “probe tender,” and it’s more important than any specific temperature. Remove from the smoker, keep wrapped, and rest for at least 1 hour. 2-3 hours in a cooler is even better — the brisket will stay hot and the juices redistribute throughout the meat.
Fat Side Up vs. Fat Side Down
This is one of the most debated topics in BBQ, and the honest answer is: it depends on your smoker. If your heat comes from below (like a bullet smoker or kamado), cook fat side down — the fat cap acts as a heat shield protecting the meat from direct heat. If your heat comes from above or the side (like an offset smoker), cook fat side up — the fat renders downward through the meat, basting it. Most Texas BBQ joints cook fat side up on offset smokers, and that’s the traditional approach. I’ve tested both on my setup and fat side up produces a marginally juicier result, but the difference is small enough that you shouldn’t stress about it.
Butcher Paper vs. Foil
Both work for wrapping, but they produce different results. Butcher paper (specifically pink/peach unlined butcher paper) is breathable — it traps enough moisture to push through the stall while still allowing some evaporation, which preserves the bark. The bark stays textured and firm. Foil creates a completely sealed environment that braises the brisket. It pushes through the stall faster and produces a juicier result, but the bark softens and can become mushy. Most competition pitmasters and Texas BBQ joints have switched to butcher paper for this reason. If you’re new to brisket, foil is more forgiving. Once you’re comfortable, try butcher paper and you probably won’t go back.
The Rest Is Non-Negotiable
I cannot overstate how important the rest period is. When you pull a brisket off the smoker at 203°F, the muscle fibers are contracted and the juices are concentrated in the center. During the rest, the fibers relax and reabsorb moisture, distributing juices evenly throughout the meat. A brisket sliced immediately after cooking loses a pool of liquid onto the cutting board — that’s flavor and moisture you’ll never get back.
Wrap the finished brisket in butcher paper (if not already wrapped), then wrap in a towel, and place in an insulated cooler. The brisket will stay above 140°F for 4-6 hours in a good cooler, and the quality improves during this time. Many BBQ restaurants rest their briskets for 4+ hours. The minimum is 1 hour. I aim for 2-3 hours and the difference between a 30-minute rest and a 2-hour rest is dramatic.
Trimming Detail
Trimming is the least glamorous part of brisket, but it directly affects the final product. Start with the fat cap — trim it to an even 1/4 inch thickness. Thicker fat doesn’t render fully and leaves a waxy, unpleasant layer. Thinner than 1/4 inch and the meat underneath dries out. Flip the brisket and remove any large, hard pieces of fat on the meat side — these are “hard fat” deposits that won’t break down during cooking. Also trim the thin, dried-out edges of the flat to create a more uniform shape. A well-trimmed brisket cooks more evenly and develops bark on more surface area.
Keep the brisket cold from the fridge while trimming — cold fat is firm and easier to cut cleanly. A sharp boning knife or a long, flexible blade is the ideal tool.
Smoker Types
Offset smoker: The traditional Texas choice. The fire burns in a separate firebox, and smoke flows through the cooking chamber. Produces excellent results but requires fire management — you’re feeding the fire every 45-60 minutes. This is hands-on BBQ.
Pellet smoker: Uses wood pellets fed by an electric auger. Set the temperature digitally and the smoker maintains it automatically. Easier to use, more consistent results, less smoke flavor than offset. Great for beginners.
Kamado (Big Green Egg, Kamado Joe): Ceramic cookers that hold temperature incredibly well. Excellent for brisket but limited cooking space.
Weber Smokey Mountain (bullet smoker): Affordable, reliable, and produces excellent brisket. Requires more attention than a pellet smoker but less than an offset.
Any smoker that holds 225°F consistently will produce good brisket. The pitmaster matters more than the equipment.
The Stall Is Normal
Around 150-170°F, the internal temperature will stop rising for hours. This is evaporative cooling — the same effect as sweating. Don’t panic, don’t crank the heat, and don’t pull the brisket early. The wrap helps push through the stall by preventing evaporation. Every brisket stalls. It’s part of the process.
Wood Selection
Oak is the traditional Texas wood — mild, clean smoke that lets the beef shine. Hickory is stronger and adds more assertive smoke flavor. Pecan is sweeter and pairs beautifully with brisket. Mesquite is intense and can turn bitter with long cooks — use sparingly or mix with a milder wood. Stay away from fruit woods (apple, cherry) for brisket — they’re better suited for pork and poultry.
Slicing
Always slice against the grain. The flat and point have different grain directions, so you’ll need to separate them and slice each portion accordingly. Slice the flat about pencil-thickness. The point can be sliced thicker or cubed into burnt ends. Serve on butcher paper with white bread, pickles, and sliced onions — the traditional Texas presentation.
Serve With
Classic coleslaw, BBQ baked beans, smoked mac and cheese, pickles, white bread, and sliced onions. Texas purists serve no sauce — the brisket should be good enough on its own. I keep sauce on the side for guests who want it, but I eat mine naked.
Leftovers
Slice and store in an airtight container with any collected juices. Reheat gently in a 300°F oven, wrapped in foil with a splash of beef broth, for 20-30 minutes. Chopped brisket makes incredible tacos, sandwiches, nachos, and chili. A 12-15 pound brisket feeds 10-15 people with leftovers.
Common Mistakes
Opening the lid too often. Every time you open the smoker, you lose heat and smoke. The temperature drops 25-50°F and takes 15-20 minutes to recover. Check the internal temperature with a remote probe thermometer instead.
Not resting long enough. A brisket that’s sliced immediately loses all its juices onto the cutting board. The minimum rest is 1 hour. 2-3 hours in an insulated cooler is better. The collagen continues to absorb moisture during the rest, making the final product juicier.
Buying too small a brisket. A full packer brisket (12-15 pounds) has both the flat and the point, which cook differently and together produce the full brisket experience. A 5-pound flat from the grocery store will work but dries out more easily and lacks the rich, fatty point meat.
Cost Breakdown
A whole packer brisket runs $4-6 per pound at most warehouse stores — roughly $50-75 for a full brisket. That feeds 10-15 people with leftovers. Compare that to $25-30 per pound at a BBQ restaurant, and the math is clear. Yes, the smoker is an investment. But after your third brisket, it’s paid for itself.
The Overnight Brisket Strategy
For a dinner serve time, start the brisket at midnight or earlier. By morning (6-8 AM), it’s through the stall and ready to wrap. By early afternoon (1-3 PM), it hits 203°F and comes off. Rest for 2-3 hours and slice at dinner time. Yes, this means setting alarms. Yes, this means stumbling to the smoker at 2 AM to check the temperature. But this overnight approach means you’re sleeping through the longest, most boring phase of the cook, and the brisket is ready when you need it.
Alternatively, start at 6-7 AM for a late dinner (8-9 PM) — this is less disruptive to your sleep schedule but requires flexibility on when you eat.
Frequently Asked Questions
How long per pound?
Plan 1-1.5 hours per pound at 225°F, but every brisket is different. Cook to temperature and tenderness, not time.
Fat side up or down?
Both work. Fat side up bastes the meat as it renders. Fat side down protects the meat from direct heat. Most Texas joints cook fat side up.
Can I do this in the oven?
Yes. Season the brisket, place in a roasting pan, cover tightly with foil, and cook at 225°F for the same duration. You won’t get smoke flavor, but the texture will be tender and delicious. Add liquid smoke to the rub if you want a hint of smokiness.
More From Off The Galley
Baby Back Ribs · Pulled Pork · Grilled Chicken Thighs · Smoked Wings · Carne Asada Tacos