
Crispy Fried Chicken
Friday night on the boat was sacred. That was the one meal every week where we pulled out the good stuff — steaks, seafood, and most importantly, fried chicken. When you’re 400 feet underwater and hav
Ingredients
For the brine
- 3-4 pounds chicken pieces (I use a mix of thighs
- drumsticks
- and breasts)
- 2 cups buttermilk
- 1 tablespoon salt
- 1 teaspoon black pepper
- 1 teaspoon garlic powder
- 1/2 teaspoon cayenne
For the coating
- 2 cups all-purpose flour
- 1 tablespoon paprika
- 1 tablespoon garlic powder
- 1 teaspoon onion powder
- 1 teaspoon salt
- 1 teaspoon black pepper
- 1/2 teaspoon cayenne
For frying
- Vegetable oil or peanut oil — enough to fill a Dutch oven or deep skillet about 2-3 inches deep
Method
Step 1: Brine
-
Combine the buttermilk with salt, pepper, garlic powder, and cayenne. Submerge the chicken pieces, cover, and refrigerate for at least 4 hours — overnight is best.
Step 2: Double-dip the coating
-
Mix all the coating ingredients in a shallow bowl. Pull each piece of chicken from the buttermilk, let the excess drip off, and press it firmly into the seasoned flour. Shake off the excess, dip it back into the buttermilk, then press into the flour again.
-
This double-dip is the secret to an extra thick, craggy crust. Those rough, shaggy bits of coating are what get super crispy in the oil.
-
After coating, set the chicken on a wire rack and let it rest for 10 minutes. This is crucial — the coating needs time to hydrate and bond with the chicken. If you fry immediately, the breading slides off.
Step 3: Fry
-
Heat oil to 325°F. Not 350, not 375 — 325. I know that sounds low, but trust me. Lower temperature means the chicken cooks all the way through before the outside gets too dark. Fried chicken that’s burnt on the outside and raw in the center means the oil was too hot.
-
Fry in batches — don’t crowd the pot. Dark meat (thighs and drumsticks) takes about 14-16 minutes. White meat (breasts) takes about 12-14 minutes. Flip halfway through. The chicken is done when the internal temp reads 165°F and the coating is deep golden brown.
-
Drain on a wire rack, not paper towels. A wire rack keeps air circulating so the bottom stays crispy. Paper towels trap steam and make it soggy.

Off the Galley Mike
Mike — Off The Galley
Six years as a Navy cook on submarines and destroyers, feeding 130 sailors from a galley the size of your bathroom. Now I cook the same big-flavor, no-nonsense food for my family of four — and share every recipe here. No culinary school. No fancy plating. Just real food that works, tested on the toughest critics afloat and the pickiest ones at home.
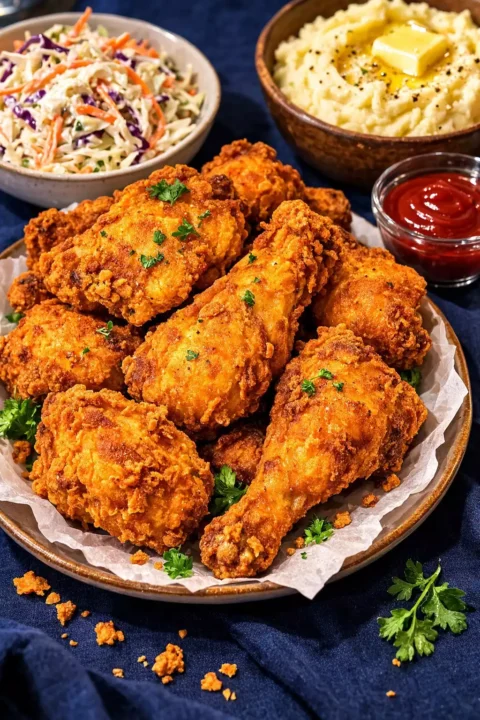
Crispy Fried Chicken — The Friday Night Recipe That Kept Morale Alive
Friday night on the boat was sacred. That was the one meal every week where we pulled out the good stuff — steaks, seafood, and most importantly, fried chicken. When you’re 400 feet underwater and haven’t seen sunlight in three weeks, Friday fried chicken is the closest thing to a holiday. My crew would literally count the days.
I’ve made a lot of fried chicken since then. At home, for neighborhood cookouts, for family dinners. This is the version that survived all of it. Double-dipped in seasoned flour, buttermilk-brined overnight, and fried at a temperature low enough to cook the inside before the outside burns. The coating shatters when you bite into it.
Why Buttermilk Changes Everything
Soaking chicken in buttermilk overnight does two things. First, the acid tenderizes the meat so even the breast pieces stay juicy. Second, the thick buttermilk creates a sticky surface that the flour coating grabs onto — and it stays there during frying instead of sliding off into the oil.
If you’ve ever had fried chicken where the breading fell off in sheets, the chicken probably wasn’t soaked long enough. Four hours minimum. Overnight is ideal.
Ingredients
For the brine: 3-4 pounds chicken pieces (I use a mix of thighs, drumsticks, and breasts), 2 cups buttermilk, 1 tablespoon salt, 1 teaspoon black pepper, 1 teaspoon garlic powder, 1/2 teaspoon cayenne.
For the coating: 2 cups all-purpose flour, 1 tablespoon paprika, 1 tablespoon garlic powder, 1 teaspoon onion powder, 1 teaspoon salt, 1 teaspoon black pepper, 1/2 teaspoon cayenne.
For frying: Vegetable oil or peanut oil — enough to fill a Dutch oven or deep skillet about 2-3 inches deep.
How to Make It
1
1Brine
Combine the buttermilk with salt, pepper, garlic powder, and cayenne. Submerge the chicken pieces, cover, and refrigerate for at least 4 hours — overnight is best.
2
2Double-dip the coating
Mix all the coating ingredients in a shallow bowl. Pull each piece of chicken from the buttermilk, let the excess drip off, and press it firmly into the seasoned flour. Shake off the excess, dip it back into the buttermilk, then press into the flour again.
This double-dip is the secret to an extra thick, craggy crust. Those rough, shaggy bits of coating are what get super crispy in the oil.
After coating, set the chicken on a wire rack and let it rest for 10 minutes. This is crucial — the coating needs time to hydrate and bond with the chicken. If you fry immediately, the breading slides off.
3
3Fry
Heat oil to 325°F. Not 350, not 375 — 325. I know that sounds low, but trust me. Lower temperature means the chicken cooks all the way through before the outside gets too dark. Fried chicken that’s burnt on the outside and raw in the center means the oil was too hot.
Fry in batches — don’t crowd the pot. Dark meat (thighs and drumsticks) takes about 14-16 minutes. White meat (breasts) takes about 12-14 minutes. Flip halfway through. The chicken is done when the internal temp reads 165°F and the coating is deep golden brown.
Drain on a wire rack, not paper towels. A wire rack keeps air circulating so the bottom stays crispy. Paper towels trap steam and make it soggy.
Tips I Learned the Hard Way
Use a thermometer. Oil temperature matters more than anything else in frying. Too hot burns the outside. Too cool makes it greasy. A clip-on deep-fry thermometer costs about $10 and it’s worth every penny.
Don’t move the chicken around. Set it in the oil and leave it alone. Constant flipping knocks off the coating.
Season the flour generously. The coating is where all the flavor lives. Bland flour equals bland chicken, no matter how good your brine is.
Rest before serving. The inside needs 5 minutes after frying to finish cooking from residual heat and for the juices to redistribute. Cutting into it immediately lets all the moisture escape.
What to Serve With It
Creamy mashed potatoes and country gravy is the classic combo. Coleslaw on the side adds crunch and acidity to cut through the richness. Cornbread rounds it out.
For the full Friday night submarine dinner experience, serve it with mashed potatoes, coleslaw, cornbread, and churros for dessert.
Hot vs Cold Fried Chicken
Here’s something people don’t talk about enough — cold fried chicken is incredible. Like, eat-it-straight-from-the-fridge-at-midnight incredible. The coating firms up and gets almost cracker-like, the chicken stays juicy, and the seasoning somehow tastes even better cold. It’s a different experience from hot fried chicken, and both are valid.
Cold fried chicken is also the ultimate picnic and road trip food. I make a double batch specifically so we have leftovers for the next day’s lunch boxes. It packs well, doesn’t need reheating, and my kids get excited about it, which means they actually eat their lunch. That alone makes the effort of frying worth it.
Storage
Leftover fried chicken keeps in the fridge for 3-4 days. To reheat and keep the crunch, use a 375°F oven for about 15 minutes. Flip halfway through. The microwave will make it soggy — avoid it. Air fryer works well too, 375°F for 5-7 minutes.
The Oil Situation
Frying at home can feel messy and intimidating. Here’s how I manage it. Use a Dutch oven — the high sides contain splatter and hold heat better than a shallow skillet. Fill it about 2-3 inches deep. For this recipe, that’s roughly 2-3 quarts of oil depending on your pot size.
After frying, let the oil cool completely, strain it through a fine mesh sieve or cheesecloth, and store it in a jar. You can reuse frying oil 3-4 times as long as it doesn’t smell off. This cuts the cost significantly since oil isn’t cheap.
Keeping It Warm for the Whole Batch
Since you’re frying in batches, the first pieces will be done before the last ones hit the oil. Set finished chicken on a wire rack over a baking sheet in a 200°F oven. This keeps them warm and crispy for up to 45 minutes while you finish frying. Don’t cover them — trapped steam turns crispy coating soft.
Frequently Asked Questions
Can I use boneless chicken?
Boneless thighs work great. Boneless breasts tend to dry out more during frying. If you use boneless, reduce frying time by 3-4 minutes and watch the temperature closely.
What oil is best?
Peanut oil has the best flavor for fried chicken. Vegetable oil and canola are more affordable and work well. Don’t use olive oil — the smoke point is too low.
Can I bake instead of fry?
You can oven-bake at 425°F on a wire rack for about 40 minutes. It won’t be the same as fried — you lose that shattering crunch — but it’s a decent alternative if you don’t want to deal with oil.
The Temperature Precision
325°F oil temperature is non-negotiable. At 300°F, the chicken absorbs too much oil and becomes greasy. At 350°F+, the exterior browns before the interior cooks, leaving you with burnt coating and raw chicken. Use a clip-on thermometer and adjust your burner throughout cooking.
More From Off The Galley
Classic Meatloaf · Chicken And Dumplings · Beef Pot Roast · Biscuits And Gravy · Chick Fil A Sauce
Off the Galley Mike
Mike — Off The Galley
Six years as a Navy cook on submarines and destroyers, feeding 130 sailors from a galley the size of your bathroom. Now I cook the same big-flavor, no-nonsense food for my family of four — and share every recipe here. No culinary school. No fancy plating. Just real food that works, tested on the toughest critics afloat and the pickiest ones at home.