

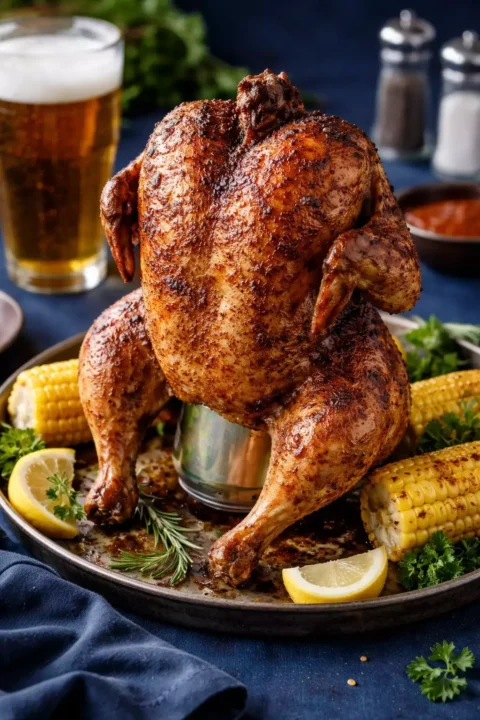
Beer Can Chicken
Whole chicken sitting on a beer can on the grill. Ridiculous looking. Insanely juicy. There’s no dignified way to describe beer can chicken. You season a whole chicken, open a can of beer, drink half
Ingredients
- 1 whole chicken (4-5 pounds)
- 1 can beer (any kind — it’s mostly about the steam)
- 2 tablespoons olive oil
- your favorite poultry rub (or: 1 tablespoon paprika
- 1 teaspoon garlic powder
- 1 teaspoon onion powder
- 1 teaspoon salt
- 1/2 teaspoon pepper
- 1/2 teaspoon cayenne)
Method
-
Remove giblets from the chicken cavity. Pat the exterior completely dry. Rub with olive oil, then apply the seasoning rub generously on all surfaces — including under the skin of the breast if you can loosen it.
-
Open the beer can and drink (or pour out) half. Place the beer can on a stable surface or a beer can chicken holder (recommended for stability). Lower the chicken onto the can so it sits upright with the legs forming a tripod with the can.
-
Set up the grill for indirect heat (coals or burners on the sides, nothing in the center). Place the chicken (still on the can) in the center of the grill. Close the lid. Cook at 350-375°F for 1.25-1.5 hours until the thickest part of the thigh reaches 175°F and the breast reaches 165°F.
-
Carefully remove from the grill (use heat-resistant gloves — the can is scalding hot). Let rest for 10-15 minutes before carefully removing the can and carving.


Off the Galley Mike
Mike — Off The Galley
Six years as a Navy cook on submarines and destroyers, feeding 130 sailors from a galley the size of your bathroom. Now I cook the same big-flavor, no-nonsense food for my family of four — and share every recipe here. No culinary school. No fancy plating. Just real food that works, tested on the toughest critics afloat and the pickiest ones at home.
Beer Can Chicken — Ridiculous Looking, Insanely Juicy, Worth the Stares
Whole chicken sitting on a beer can on the grill. Ridiculous looking. Insanely juicy. There’s no dignified way to describe beer can chicken. You season a whole chicken, open a can of beer, drink half of it, and shove the can up into the chicken’s cavity. Then you stand the whole thing upright on the grill and cook it for about 1.5 hours. It looks absurd. It works incredibly well. The steam from the beer keeps the interior moist while the indirect heat crisps the skin all around.
Why It Works
The beer (or any liquid) inside the can produces steam as it heats. This steam rises inside the chicken cavity, keeping the breast meat moist from the inside. Meanwhile, the chicken is standing upright, which means heat circulates around the entire bird evenly — no more dry breast and undercooked thighs. The skin gets exposure from all sides and crisps evenly.
Ingredients
1 whole chicken (4-5 pounds), 1 can beer (any kind — it’s mostly about the steam), 2 tablespoons olive oil, your favorite poultry rub (or: 1 tablespoon paprika, 1 teaspoon garlic powder, 1 teaspoon onion powder, 1 teaspoon salt, 1/2 teaspoon pepper, 1/2 teaspoon cayenne).
How to Make It
Remove giblets from the chicken cavity. Pat the exterior completely dry. Rub with olive oil, then apply the seasoning rub generously on all surfaces — including under the skin of the breast if you can loosen it.
Open the beer can and drink (or pour out) half. Place the beer can on a stable surface or a beer can chicken holder (recommended for stability). Lower the chicken onto the can so it sits upright with the legs forming a tripod with the can.
Set up the grill for indirect heat (coals or burners on the sides, nothing in the center). Place the chicken (still on the can) in the center of the grill. Close the lid. Cook at 350-375°F for 1.25-1.5 hours until the thickest part of the thigh reaches 175°F and the breast reaches 165°F.
Carefully remove from the grill (use heat-resistant gloves — the can is scalding hot). Let rest for 10-15 minutes before carefully removing the can and carving.
Beer Selection
The beer flavor doesn’t dramatically impact the chicken — most of it evaporates as steam. Use whatever you have. Lager is the classic choice. Some people use apple juice, chicken broth, or even cola instead of beer. All produce steam and all work. The seasoning rub and the grill smoke contribute far more flavor than the liquid inside the can.
The Stability Issue
The biggest practical challenge is keeping the chicken upright. A dedicated beer can chicken holder (a metal stand that supports the can and has legs) is a $10 investment that eliminates the wobble problem. Without one, position the chicken’s legs forward to create a stable tripod and work carefully.
Serve With
Grilled corn, coleslaw, potato salad, baked beans. Beer can chicken is a complete protein that feeds 4-5 people from a single bird.
Frequently Asked Questions
Can I do this in the oven?
Yes. Place the chicken (on the can) on a roasting pan and bake at 375°F for 1.25-1.5 hours. You won’t get the grill flavor but the steam method still keeps the meat juicy.
Is this safe with the paint on the can?
The exterior paint on aluminum cans is food-safe at cooking temperatures. For extra caution, use an unpainted stainless steel beer can chicken holder.
The Science Behind It
Beyond the steam, beer can chicken works because the vertical position is superior for even cooking. Horizontal chickens have the breast facing up, exposed to the most heat, while the thighs (which need more time) are closer to the pan. Vertical positioning exposes the thighs to direct heat from all sides while slightly shielding the breast, resulting in both reaching the correct temperature at roughly the same time.
Spatchcocking vs. Beer Can
Spatchcocking (removing the backbone and pressing flat) is the faster method — about 45 minutes vs. 1.5 hours. It produces crispier, more even skin. Beer can chicken produces juicier breast meat and a more dramatic presentation. Both are excellent methods for a whole chicken. I use spatchcock for weeknight dinners and beer can chicken for weekend cookouts when presentation matters.
Troubleshooting
Skin not crispy enough: Pat the chicken completely dry before seasoning. Moisture on the skin prevents crisping. Also, make sure the grill temperature is 350°F+ — lower temperatures steam the skin instead of crisping it.
Chicken falls over: Use a dedicated beer can chicken stand ($10). Or position the legs wide as a tripod and place the chicken against something stable in the grill.
Uneven cooking: Rotate the chicken 180° halfway through if your grill has hot spots. Use a two-probe thermometer — one in the breast, one in the thigh — to monitor both simultaneously.
Leftover Chicken
A 5-pound beer can chicken yields about 3 cups of shredded meat. Use leftovers for chicken enchiladas, fajitas, salads, sandwiches, or tacos. The smoky grill flavor carries into every dish.
The Crispy Skin Secret
Pat the chicken completely dry — inside and outside. Moisture on the skin steams instead of crisping. If you have time, season the chicken and place it uncovered in the fridge for 4-24 hours. The refrigerator’s dry air dehydrates the skin, which produces dramatically crispier results on the grill. This same technique works for any roasted or grilled whole chicken. The dry skin hits the hot air and immediately starts browning instead of spending the first 20 minutes evaporating surface moisture.
How Many Does It Feed
A 4-5 pound chicken feeds 4-5 people comfortably. For a larger crowd, cook two chickens simultaneously — most grills can accommodate two standing chickens side by side.
Beer can chicken is the recipe that proves BBQ doesn’t have to be complicated to be great. One chicken, one can of beer, one rub, one grill. Two hours later, you have enough juicy, smoky chicken to feed your family with enough leftovers for tomorrow’s lunch. That’s efficient cooking.
Spatchcock vs. Beer Can
Spatchcocking (removing the backbone and flattening the chicken) is the other popular method for grilling a whole chicken. Spatchcock produces more even cooking and crispier skin because the bird lies flat. Beer can chicken produces juicier breast meat because of the steam. Both are excellent. I spatchcock when I want maximum crispy skin and faster cooking (45 minutes vs. 90 minutes). I use the beer can method when I want the juiciest possible breast meat and enjoy the theatrical presentation.
Timing and Temperature
Beer can chicken is done when the thigh reaches 175°F and the breast reaches 165°F. The thigh temperature is your primary target because dark meat needs higher temperatures to render properly. At 350-375°F grill temperature, expect 1.25-1.5 hours for a 4-5 pound chicken. Don’t open the lid constantly — every time you open it, you lose heat and extend the cooking time by 5-10 minutes. Check once at the 1-hour mark, then monitor more frequently as you approach the target temperature.
The Presentation
Beer can chicken is one of the most visually entertaining things you can cook. Guests always comment on it, take photos of it, and ask about it. It’s a conversation starter that doubles as dinner. When you carefully lift the finished chicken off the grill — golden, glistening, still standing upright on its can — it’s genuinely impressive. The presentation factor alone makes this recipe worth trying at least once.
Leftover Strategy
A whole chicken yields enough meat for multiple meals. Carve the legs and thighs for dinner. Shred the breast meat for chicken enchiladas, tacos, salads, or sandwiches the next day. Strip the carcass completely and make chicken stock from the bones. One chicken, three meals — that’s the kind of efficiency that would make any galley cook proud.
How long does it take?
At 350-375°F, a 4-5 pound chicken takes 1.25-1.5 hours. Use a meat thermometer — time is a guideline, temperature is the rule.
More From Off The Galley
Texas Brisket · Baby Back Ribs · Pulled Pork · Grilled Chicken Thighs · Crispy Fried Chicken

Off the Galley Mike
Mike — Off The Galley
Six years as a Navy cook on submarines and destroyers, feeding 130 sailors from a galley the size of your bathroom. Now I cook the same big-flavor, no-nonsense food for my family of four — and share every recipe here. No culinary school. No fancy plating. Just real food that works, tested on the toughest critics afloat and the pickiest ones at home.